The Ultimate Workflow for ChatGPT-5 Codex in 2025
AI coding has come a long way since the first experiments with autocomplete. The old cut and paste method was peak AI coding at one time, but now it is antiquated. Today’s AI coding tools are built into IDEs and ready to code in a moment’s notice. Then Codex delivered and it changed once again. (I am sure it will continue to change every day/week/month into the future).
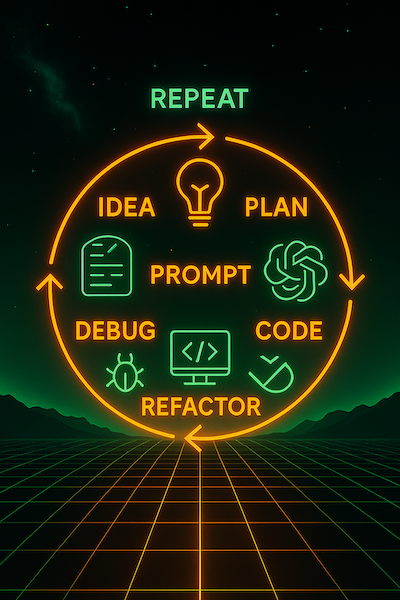
That’s why I keep a simple workflow, but it is constantly evolving. Current flow begins with outlining a project, one of the most crucial steps when using AI to help you code. These are some recommended ideas (at least for my process) to upgrade your workflow with Codex and ChatGPT-5.
⸻
Step 1: Start with a Clear Project Idea
Codex can only mirror the clarity you give it. Every time I skip this step I end up rewriting half the app.
Before you open a chat window, jot down:
- What do I want to build? (Website, app, game, script, API, etc.)
- Who is it for? (Personal project, portfolio, real users)
- What’s the smallest version that still makes me proud?
💡 Quick idea: “I want to build a to-do app with three features—add tasks, mark them complete, and filter by completed or not.”
For more beginner-friendly prompts, peek at What Is Vibecoding? The Complete Beginner’s Guide ↗.
⸻
Step 2: Plan With Codex Before You Code
Codex improvises when you throw it straight into the codebase. Slow down and ask for a plan first—I usually say, “Before we touch code, sketch the tech plan for me.”
Prompts that work for me:
- “Outline the folder structure and files I’ll need.”
- “List the key components and how they interact.”
- “Suggest dependencies and why they’re helpful.”
I treat the response like a mini design doc. I tweak the plan, ask follow-up questions, and then say, “Cool, let’s tackle step one together.”
⸻
Step 3: Set Up Your Development Environment
Your environment is the stage where Codex performs. After losing progress one too many times, I now do a five-minute setup ritual:
- VSCode (or Cursor) with a Codex-friendly extension installed.
- GitHub repo created, even if it’s private—commit early.
- Node.js or Python ready to go, depending on the project.
- A backup cloud workspace like Replit or GitHub Codespaces for travel days.
Need help choosing gear? Check out The Beginner’s Toolkit for Vibecoding in 2025 ↗.
⸻
Step 4: Create Skeleton Code
Codex does its best work when it has anchors. I give it structure before I ever ask for a feature:
- Create folders like
/components,/services,/tests. - Add placeholder files with comments (“// Navbar component lives here.”)
- Draft a README with the project goal, stack, and guardrails.
Now Codex understands the shape of the project and doesn’t invent a weird file tree at 2 a.m.
⸻
Step 5: Build Features in Small Chunks
Big prompts lead to big rewrites. I keep things calm by shipping one feature at a time.
My loop looks like this: pick one feature → ask Codex for just that → review line by line → run tests.
💡 Quick win: “Here’s my Header component. Add a dark-mode toggle button. Please leave everything else untouched.”
Working in small slices keeps Codex focused and makes rollbacks painless.
⸻
Step 6: Debug the Smart Way
Blanket requests like “fix this” make Codex guess. Instead, I share the error, explain what I tried, and ask for a plan before a fix.
Try this: “Here’s the error message, here’s the code, and my goal is X. Can you outline a step-by-step debugging approach?”
Once the plan looks right, I green-light the changes or run the steps myself. For more practical tricks, stop by Tips and Tricks for Using Codex in VSCode ↗.
⸻
Step 7: Refactor and Optimize
“Done” code isn’t the finish line. Codex is great at cleanup when you give it intent.
- Ask for simpler logic where things feel messy.
- Request naming suggestions when variables get cryptic.
- Have it spot obvious performance tweaks or repeated patterns.
Treat refactoring as a conversation and you’ll level up alongside the AI.
⸻
Step 8: Test Early and Often
I learned the hard way that skipping tests just means shipping bugs faster. Codex can help here too:
- Generate unit tests for key functions.
- Mock APIs or data to simulate real scenarios.
- Brainstorm edge cases you might miss when you’re tired.
Even lightweight tests keep regressions from sneaking in later.
⸻
Step 9: Document as You Go
Future-you will forget why Present-you made that weird decision. I ask Codex to help with:
- Inline comments for complex logic.
- README updates with setup steps and scripts.
- Example snippets that show how to use the feature.
Docs keep collaboration smooth—even when you’re collaborating with yourself.
⸻
Step 10: Deploy and Share
Shipping builds momentum. I pick a target before I start so “done” has a clear meaning.
For web apps I lean on Vercel or Netlify. For backends I like Railway or Render. For tiny experiments I drop a Loom walkthrough or share the repo.
Hit publish, celebrate, and capture what you’d do differently next time. That’s how each cycle gets smoother.
⸻
Common Pitfalls to Avoid
- Asking Codex to build the whole project in one prompt.
- Skipping version control because “it’s just a prototype.”
- Hardcoding secrets like API keys.
- Ignoring logs and telemetry when things feel buggy.
- Building shiny features nobody asked for.
If you want a deeper breakdown, read The Biggest Mistakes New Vibecoders Make (and How to Dodge Them) ↗.
⸻
Final Thoughts
Codex isn’t your senior engineer, it’s the teammate that keeps you moving. You set the vision, the boundaries, and the pace. Codex fills in the blanks, drafts the boilerplate, and keeps the momentum high.
When you follow this workflow, you trade chaotic experiments for projects you actually create. You also learn to think like a developer while vibecoding. You’re the director, Codex is the orchestra. Together you can build faster, learn deeper, and bring your ideas to life.